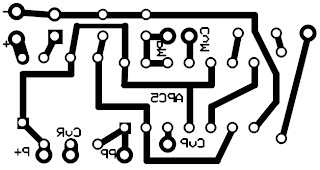
This is my layout for my Atari Punk Console. This is about as compact as you can probably make this device without going to surface mount. The + and - go to a switch to the battery. The P+ supplies the positive voltage to the two pots (right side), the PP goes to the wiper of the Pitch Pot, the PM goes to the wiper of the Mod Pot, CvR provides a voltage to the two control voltage RTS 1/4 jacks and should connect to the ring of both jacks. This will allow you to use an expression pedal to sweep pitch or mod. Note the resistor presents too much current from flowing if you short out the connection. The CvP goes to the tip of the pitch control voltage quarter inch, and the CvM goes to the tip of the mod control voltage quarter inch jack. The output goes to the tip of the 1/4 right of an audio pot 10k-100k. The wiper goes to the tip of quarter inch jack. The sleeve of the jacks should all be connected together and grounded.
This design makes use of both modulation connections on the 556 chip so you can modulate pitch and wave shape.
This setup has the following additional components:
2 stereo 1/4 inch jacks for control voltage or expression pedal input
1 mono 1/4 inch jack for output
2 500k - 1M linear taper pots (either work) for pitch and wave form modulation
1 10k-100k audio taper pot (either should work) for volume
1 SPST toggle switch for on/off
1 battery clip or 9V supply connecter (or both)
1 case of some type, a lot of options here but I like the "Really Useful Box" series from Office Depot because they are easy to drill holes in.
Here is a video demonstration of this device:
You can use this to make a PCB. You will have to scale to the correct size. The spacing between the pins on the chip should be 0.1 inch. The output will be the contact on the far right.


No comments:
Post a Comment